1. 安装Nvidia显卡驱动
检查显卡
1
2
3
4
5
6
|
##安装依赖包
yum -y install pciutils gcc gcc-c++ wget kernel-devel kernel-headers
##检查Nvidia硬件
lspci | grep VGA
#出现类似以下的结果,如果服务器上没有NVIDIA显卡,就可以终止了
#04:00.0 VGA compatible controller: NVIDIA Corporation GP102 [GeForce GTX 1080 Ti] (rev a1)
|
检查内核版本
1
2
3
4
5
6
7
8
9
|
uname -sr
#Linux 3.10.0-1160.6.1.el7.x86_64

ls /boot | grep vmlinuz
#vmlinuz-3.10.0-1160.6.1.el7.x86_64

rpm -aq |grep kernel-devel
#kernel-devel-3.10.0-1160.6.1.el7.x86_64
|
注意:保证内核版本和源码版本一样,否则安装报错!!!!!!
若内核和源码需要从FC官方网站上下载与内核版本对应的源码包进行安装.
可以在以下网站下载并安装:
http://rpmfind.net/linux/rpm2html/search.php?query=kernel-devel
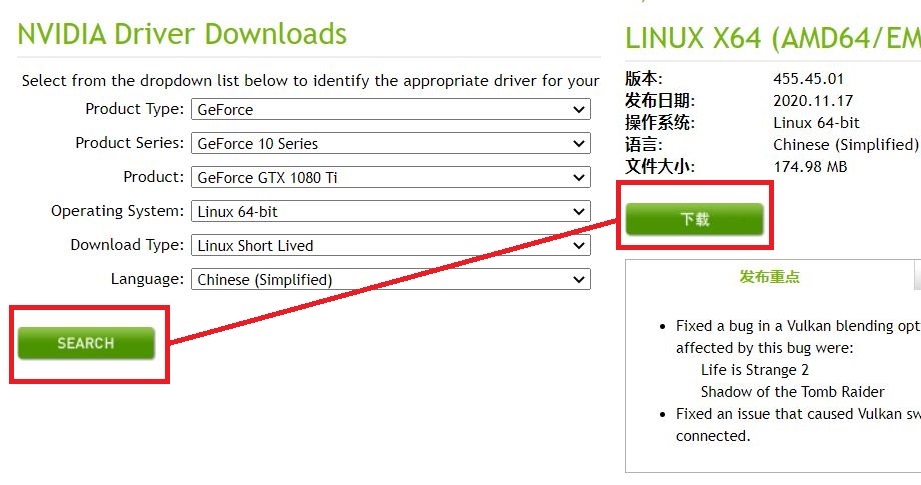
下载显卡驱动
驱动下载https://www.nvidia.com/Download/index.aspx
勾选相应型号,并下载安装脚本
禁用自带的驱动
1
2
3
4
5
|
vi /lib/modprobe.d/dist-blacklist.conf

#blacklist nvidiafb
blacklist nouveau
options nouveau modeset=0
|

 1
 2
 3
 4
 5
 6
 7
 8
 9
10
11
12
|
##重建 initramfs image
mv /boot/initramfs-$(uname -r).img /boot/initramfs-$(uname -r).img.bak
dracut /boot/initramfs-$(uname -r).img $(uname -r)

##切换到文本模式
systemctl set-default multi-user.target

##重启
init 6

##重启之后,检查是否禁用,如果没有显示相关的内容,说明已禁用
lsmod | grep nouveau
|
安装驱动
1
2
3
4
5
6
|
##安装下载的驱动
./NVIDIA-Linux-x86_64-455.45.01.run
##如果找不到kernel的源码,可以通过命令指定
#./NVIDIA-Linux-x86_64-455.45.01.run --kernel-source-path=/usr/src/kernels/3.10.0-1160.6.1.el7.x86_64  -k $(uname -r)

## 执行后,开始解压驱动包,进入安装步骤,可能中间会出现一些警告,但是不影响
|


安装完成!
检查驱动
1
2
3
4
|
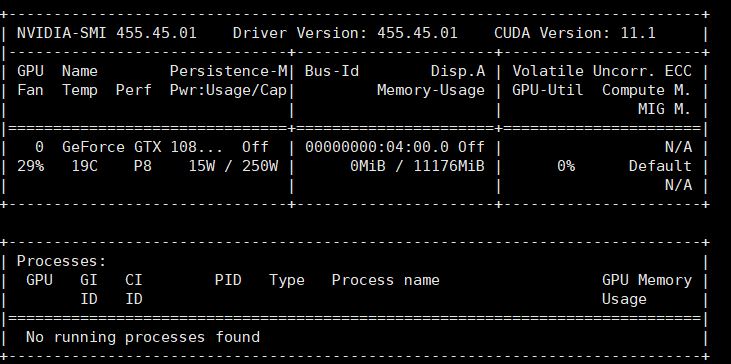
# 查看GPU相关配置
nvidia-smi
# 如果正常显示安装的显卡信息,则说明驱动安装成功;
# 如果提示找不到该指令,或什么信息都没有显示,则驱动安装失败,可以卸载驱动后重新安装
|
2.安装nvidia-docker2
 1
 2
 3
 4
 5
 6
 7
 8
 9
10
11
12
13
14
|
##删除老的nvidia-docker,安装nvidia-docker2
##docker volume ls -q -f driver=nvidia-docker |xargs -r -I{} -n1 docker ps -q -a -f volume={} |xargs -r docker rm -f
sudo yum remove nvidia-docker

distribution=$(. /etc/os-release;echo$ID$VERSION_ID)
curl -s -L https://nvidia.github.io/nvidia-docker/$distribution/nvidia-docker.repo |\
sudo tee /etc/yum.repos.d/nvidia-docker.repo

sudo yum install -y nvidia-docker2
sudo pkill -SIGHUP dockerd

##Docker测试Nvidia驱动
docker run --rm --gpus all nvidia/cuda:11.1-devel-centos7 nvidia-smi
|
3.安装k8s-device-plugin
参考:https://github.com/NVIDIA/k8s-device-plugin#enabling-gpu-support-in-kubernetes
1
|
kubectl create -f https://raw.githubusercontent.com/NVIDIA/k8s-device-plugin/v0.7.2/nvidia-device-plugin.yml
|
 1
 2
 3
 4
 5
 6
 7
 8
 9
10
11
12
13
14
15
16
17
18
19
20
21
22
23
24
25
26
27
28
29
30
31
32
33
34
35
36
37
38
39
40
41
42
43
44
45
46
47
48
49
|
apiVersion: apps/v1
kind: DaemonSet
metadata:
  name: nvidia-device-plugin-daemonset
  namespace: kube-system
spec:
  selector:
    matchLabels:
      name: nvidia-device-plugin-ds
  updateStrategy:
    type: RollingUpdate
  template:
    metadata:
      # This annotation is deprecated. Kept here for backward compatibility
      # See https://kubernetes.io/docs/tasks/administer-cluster/guaranteed-scheduling-critical-addon-pods/
      annotations:
        scheduler.alpha.kubernetes.io/critical-pod: ""
      labels:
        name: nvidia-device-plugin-ds
    spec:
      tolerations:
      # This toleration is deprecated. Kept here for backward compatibility
      # See https://kubernetes.io/docs/tasks/administer-cluster/guaranteed-scheduling-critical-addon-pods/
      - key: CriticalAddonsOnly
        operator: Exists
      - key: nvidia.com/gpu
        operator: Exists
        effect: NoSchedule
      # Mark this pod as a critical add-on; when enabled, the critical add-on
      # scheduler reserves resources for critical add-on pods so that they can
      # be rescheduled after a failure.
      # See https://kubernetes.io/docs/tasks/administer-cluster/guaranteed-scheduling-critical-addon-pods/
      priorityClassName: "system-node-critical"
      containers:
      - image: nvidia/k8s-device-plugin:v0.7.2
        name: nvidia-device-plugin-ctr
        args: ["--fail-on-init-error=false"]
        securityContext:
          allowPrivilegeEscalation: false
          capabilities:
            drop: ["ALL"]
        volumeMounts:
          - name: device-plugin
            mountPath: /var/lib/kubelet/device-plugins
      volumes:
        - name: device-plugin
          hostPath:
            path: /var/lib/kubelet/device-plugins
|
gpu-pod.yaml 进行测试
 1
 2
 3
 4
 5
 6
 7
 8
 9
10
|
apiVersion: v1
kind: Pod
metadata:
  name: gpu-pod
spec:
  containers:
    - name: cuda-container
      image: nvidia/cuda:11.1-devel-centos7
    - name: digits-container
      image: nvidia/digits:6.0
|
编写测试yaml,执行 kubectl create -f gpu-pod.yaml
发现pod调度到GPU服务器执行,并显示结果说明成功
4.k8s安装tensorflow
参考:https://blog.csdn.net/vah101/article/details/108098827
创建tensorflow.yaml
 1
 2
 3
 4
 5
 6
 7
 8
 9
10
11
12
13
14
15
16
17
18
19
20
21
22
23
24
25
26
27
28
29
30
31
32
33
34
35
36
37
38
|
apiVersion: apps/v1
kind: Deployment
metadata:
  name: tensorflow-gpu-jupyter
  labels:
    app: tensorflow-gpu-jupyter
spec:
  replicas: 1
  selector: # define how the deployment finds the pods it mangages
    matchLabels:
      app: tensorflow-gpu-jupyter
  template: # define the pods specifications
    metadata:
      labels:
        app: tensorflow-gpu-jupyter
    spec:
      containers:
      - name: tensorflow-gpu-jupyter
        image: tensorflow/tensorflow:latest-gpu-jupyter
        #resources:
        #  limits:
        #    nvidia.com/gpu: 1

---
apiVersion: v1
kind: Service
metadata:
 name: tensorflow-gpu-jupyter
 labels:
  app: tensorflow-gpu-jupyter
spec:
 type: NodePort
 ports:
 - port: 8888
   targetPort: 8888
   nodePort: 30999
 selector:
  app: tensorflow-gpu-jupyter
|
执行 kubectl create -f tensorflow.yaml
等待服务正常启动,就可以访问30999端口的jupyter服务了.