部署docker registry
创建用户
需要在cephfs中创建单独的用户docker-registry,并分配单独的目录/docker-registry
1
2
3
4
5
6
7
|
apiVersion: v1
kind: Secret
metadata:
  name: docker-registry-secret
data:
###通过ceph auth get-key client.docker-registry |base64 获取 ###
  key: QVFDR2tSaGNVSXdpTHhBQWVVZXRtd1VncVR0ZFVQMlA5MXFLbmc9PQ==
|
创建PV
 1
 2
 3
 4
 5
 6
 7
 8
 9
10
11
12
13
14
15
16
17
18
19
20
21
22
23
24
25
26
|
apiVersion: v1
kind: PersistentVolume
metadata:
  name: docker-registry-pv
  labels:
    pv: docker-registry-pv
spec:
  capacity:
    storage: 5Gi
  accessModes:
    - ReadWriteMany
  cephfs:
    monitors:
      - node1:6789
      - node2:6789
      - node3:6789
    ###可以配置cephfs的子目录,绑定不同的用户,用于权限隔离####
    path: /docker-registry
    ###ceph的账号###
    user: docker-registry
    secretRef:
    ###和ceph-secret.yaml中的metadata.name保持一致###
      name: docker-registry-secret
    readOnly: false
    ###回收策略:Retain手动回收,Recycle需要擦出后才能再使用,Delete相关联的存储资产被删除####
  persistentVolumeReclaimPolicy: Recycle
|
创建PVC
 1
 2
 3
 4
 5
 6
 7
 8
 9
10
11
12
13
14
|
kind: PersistentVolumeClaim
apiVersion: v1
metadata:
  name: docker-registry-pvc
spec:
  accessModes:
    - ReadWriteMany
  resources:
    requests:
      storage: 5Gi
  selector:
    matchLabels:
    ###和cephfs-pv.yaml中的labels对应###
      pv: docker-registry-pv
|
创建docker registry pod
 1
 2
 3
 4
 5
 6
 7
 8
 9
10
11
12
13
14
15
16
17
18
19
20
21
22
23
24
25
26
27
28
29
30
31
32
33
34
35
|
###声明 Deployment####
apiVersion: apps/v1
kind: Deployment
metadata:
  name: docker-registry
  labels:
    app: docker-registry
spec:
  replicas: 1
  selector:
    matchLabels:
      app: docker-registry
  template:
    metadata:
      labels:
        app: docker-registry
    spec:
      containers:
      - name: docker-registry
        image: registry:2.7.1
        ports:
        - containerPort: 5000
        volumeMounts:
        ###挂载点###
        - mountPath: /var/lib/registry
          ###对应下面卷 cephfs-pvc-pod 的名称###
          name: docker-registry-pvc
          ###指定子目录,会在cephfs里创建子文件夹####
          subPath: basesoft/dockerregistry/pvc
      volumes:
      ###卷名称,对应上面的挂载名称###
      - name: docker-registry-pvc
        persistentVolumeClaim:
          ###对应cephfs-pvc.yaml的metadata.name###
          claimName: k8s-pvc
|
创建service
如果需要nodePort,在文件里修改
 1
 2
 3
 4
 5
 6
 7
 8
 9
10
11
12
13
14
15
16
17
18
19
20
21
22
23
24
25
26
27
28
29
30
31
|
###可以使用 kubectl api-versions 查询支持的version###
apiVersion: v1
### service 类型####
kind: Service
###元数据###
metadata:
  ###service的名称####
  name: docker-registry
###具体描述###
spec:
  ###标签选择器###
  selector:
    ###标签是 nginx 的pod###
    app: docker-registry
  ###节点类型是 NodePort ###
  #type: NodePort

  ###虚拟IP###
  clusterIP: 10.98.239.102
  ###端口列表###
  ports:
  ###http的端口说明###
  - name: http
    ###TCP协议###
    protocol: TCP
    ###虚拟IP的端口是80###
    port: 5000
    ###pod的端口是80,一般和port属性一致###
    #targetPort: 80
    ###实际物理机IP映射的端口,一般自动分配, kubectl get services 可以查看,如果外部有LB,可以指定,方便管理####
    #nodePort: 31000
|
增加私有仓库
三台都要修改,重启docker
 1
 2
 3
 4
 5
 6
 7
 8
 9
10
|
vi /etc/docker/daemon.json

{
"registry-mirrors": ["https://xuachqgw.mirror.aliyuncs.com"],
"insecure-registries": ["10.98.239.102:5000"],
"bip":"172.17.0.1/16",
"log-driver":"json-file",
"log-opts":{"max-size":"10m"}
}
|
重启docker
1
2
|
systemctl daemon-reload
systemctl restart docker
|
发布应用
https://www.kubernetes.org.cn/2362.html
https://zhangguanzhang.github.io/2018/04/29/kubernetes-configMap-mount/
例子参考文件:
 1
 2
 3
 4
 5
 6
 7
 8
 9
10
11
12
13
14
15
16
17
18
19
20
21
22
23
24
25
26
27
28
29
30
31
32
33
34
35
36
37
38
39
40
41
42
43
44
45
46
47
48
49
50
51
52
53
54
55
56
57
58
59
60
61
62
63
64
65
66
67
68
69
70
71
72
73
74
|
#test-pod
apiVersion: v1 #指定api版本,此值必须在kubectl apiversion中
kind: Pod #指定创建资源的角色/类型
metadata: #资源的元数据/属性
  name: test-pod #资源的名字,在同一个namespace中必须唯一
  labels: #设定资源的标签
    k8s-app: apache
    version: v1
    kubernetes.io/cluster-service: "true"
  annotations:            #自定义注解列表
    - name: String        #自定义注解名字
spec: #specification of the resource content 指定该资源的内容
  restartPolicy: Always #表明该容器一直运行,默认k8s的策略,在此容器退出后,会立即创建一个相同的容器
  nodeSelector:     #节点选择,先给主机打标签kubectl label nodes kube-node1 zone=node1
    zone: node1
  containers:
  - name: test-pod #容器的名字
    image: 10.192.21.18:5000/test/chat:latest #容器使用的镜像地址
    imagePullPolicy: Never #三个选择Always.Never.IfNotPresent,每次启动时检查和更新(从registery)images的策略,
                           # Always,每次都检查
                           # Never,每次都不检查(不管本地是否有)
                           # IfNotPresent,如果本地有就不检查,如果没有就拉取
    command: ['sh'] #启动容器的运行命令,将覆盖容器中的Entrypoint,对应Dockefile中的ENTRYPOINT
    args: ["$(str)"] #启动容器的命令参数,对应Dockerfile中CMD参数
    env: #指定容器中的环境变量
    - name: str #变量的名字
      value: "/etc/run.sh" #变量的值
    resources: #资源管理
      requests: #容器运行时,最低资源需求,也就是说最少需要多少资源容器才能正常运行
        cpu: 0.1 #CPU资源(核数),两种方式,浮点数或者是整数+m,0.1=100m,最少值为0.001核(1m)
        memory: 32Mi #内存使用量
      limits: #资源限制
        cpu: 0.5
        memory: 1000Mi
    ports:
    - containerPort: 80 #容器开发对外的端口
      name: httpd  #名称
      protocol: TCP
    livenessProbe: #pod内容器健康检查的设置
      httpGet: #通过httpget检查健康,返回200-399之间,则认为容器正常
        path: / #URI地址
        port: 80
        #host: 127.0.0.1 #主机地址
        scheme: HTTP
      initialDelaySeconds: 180 #表明第一次检测在容器启动后多长时间后开始
      timeoutSeconds: 5 #检测的超时时间
      periodSeconds: 15  #检查间隔时间
      #也可以用这种方法
      #exec: 执行命令的方法进行监测,如果其退出码不为0,则认为容器正常
      #  command:
      #    - cat
      #    - /tmp/health
      #也可以用这种方法
      #tcpSocket: //通过tcpSocket检查健康
      #  port: number
    lifecycle: #生命周期管理
      postStart: #容器运行之前运行的任务
        exec:
          command:
            - 'sh'
            - 'yum upgrade -y'
      preStop:  #容器关闭之前运行的任务
        exec:
          command: ['service httpd stop']
    volumeMounts:  #挂载持久存储卷
    - name: volume #挂载设备的名字,与volumes[*].name 需要对应
      mountPath: /data #挂载到容器的某个路径下
      readOnly: True
  volumes: #定义一组挂载设备
  - name: volume #定义一个挂载设备的名字
    #meptyDir: {}
    hostPath:
      path: /opt #挂载设备类型为hostPath,路径为宿主机下的/opt,这里设备类型支持很多种
    #nfs
|
下载tomcatexample.zip例子文件
 1
 2
 3
 4
 5
 6
 7
 8
 9
10
11
12
13
14
15
16
17
|
###构建项目的镜像例子###
docker build -t 10.98.239.102:5000/mzywx-tomcat:8.5.37-jre8 -f ./mzywx-tomcat.df .

###把项目的镜像发布到仓库###
docker push 10.98.239.102:5000/mzywx-tomcat:8.5.37-jre8

###查看docker镜像###
docker images |grep mzywx-tomcat

###k8s 发布tomcat应用,需要等一会,tomcat启动慢###
kubectl apply -f mzywx-tomcat-deployment.yaml

###查看创建成功pod的内网虚拟IP###
kubectl get pods -o wide

###访问tomcat服务,默认输出 mzywx-tomcat###
curl http://192.168.2.28:8080
|
清理无用的镜像
https://www.kubernetes.org.cn/4508.html
https://www.cnblogs.com/leejack/p/8319311.html
1
2
3
4
5
6
7
|
###清理docker容器和镜像###
docker system prune -a -f --filter "until=1h"

###清理docker-registry,进入pod执行清理命令###
kubectl exec -it $(kubectl get pod -l app=docker-registry -o jsonpath="{.items[*].metadata.name}") /bin/registry garbage-collect /etc/docker/registry/config.yml

###可以做成定期执行清理任务###
|
安装Jenkins
在k8s master上安装jenkins,待细节完善.
修改jenkins的地址为: http://updates.jenkins-ci.org/update-center.json

-
编译打包maven项目
-
使用dockerfile模板生成新的镜像,版本号默认shell获取当前时间
-
镜像发布到仓库
-
使用deployment和service模板,使用nodePort生成可以访问的服务.
-
强制:只持久化项目的upload文件夹和tomcat的logs文件夹.
注意:tomcat对资源要求大,至少1核2G,我现在默认的是2核4G,不然会一直卡到pod超时重启,无法正常启动.
下载tomcat-k8s.zip示例文件
Jenkins发布应用
Jenkins地址:http://10.0.8.35:8080/
账号:admin 密码:admin
参照springrain-system-web项目,主要注意的配置如下:
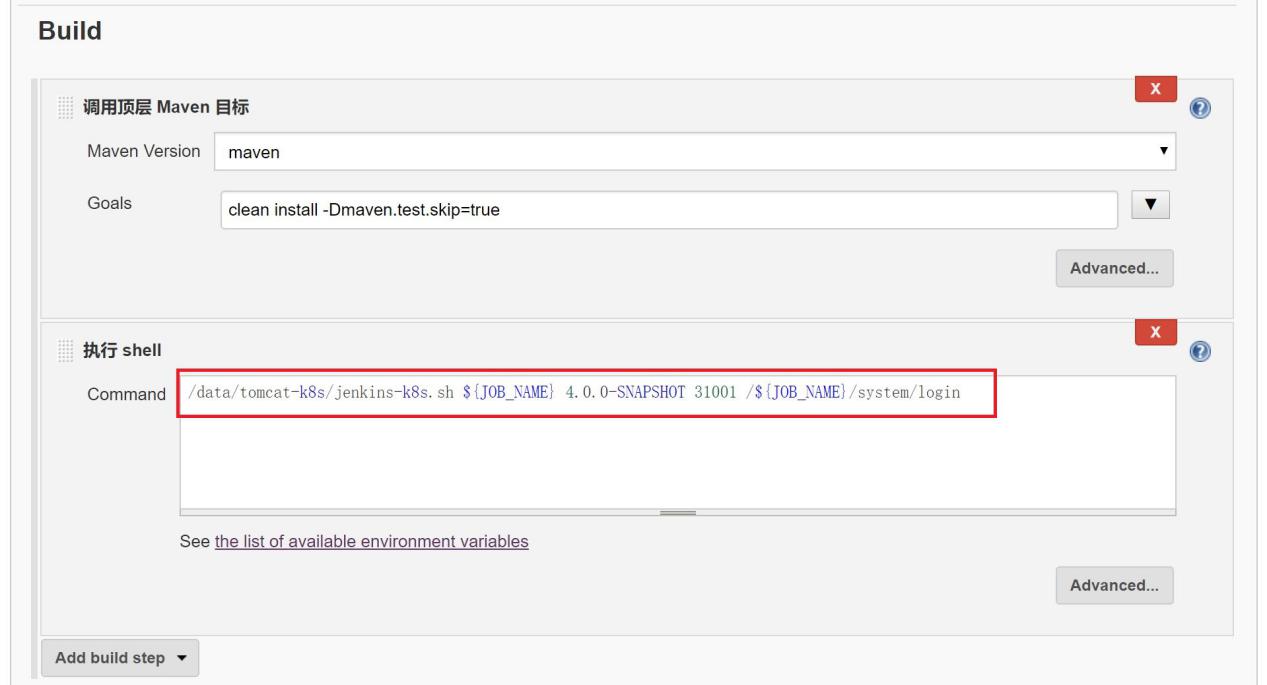
执行shell需要四个参数:项目名称,项目版本,项目端口,健康检查地址
springrain-system-web项目的配置是:
/data/tomcat-k8s/jenkins-k8s.sh
$WORKSPACE/springrain-system/springrain-system-web
springrain-system-web 6.0.0-SNAPSHOT 31002
/springrain-system-web/api/checkHealth
就是需要发布springrain-system-web,版本号是6.0.0-SNAPSHOT(和pom中version保持一致),通过31002端口访问,访问/springrain-system-web/api/checkHealth的HTTP状态码在200和399之间,则认为容器运转正常.
每个项目分配一个端口,介于31000 --
32000之间,发布之后通过http://10.0.8.28:端口/项目名称 访问,
例如
http://10.0.8.28:31002/springrain-system-web/api/checkHealth
需要注意:项目根目录下的upload和tomcat下的logs目录会持久化,其他的数据重启之后都会重置!